REVIEW · RHODES
Stained Glass Workshop
Book on Viator →Operated by One day stained glass course · Bookable on Viator
Stained glass turns your holiday into something you can hang at home. In Rhodes, this small-class workshop teaches the Tiffany-style basics step-by-step, so you leave with a real, one-of-a-kind suncatcher you made yourself. It’s the kind of activity that feels calm and creative, but still structured enough that you’re not guessing your way through tools.
I love the 2-person limit. That means you get real individual tuition at the workbench, not a rushed demo where you watch from the sidelines. I also like that the class is built around practical progress: tools, cutting, grinding, copper tape, then soldering—so the skills make sense as you go.
One drawback to consider: you’ll be standing for most of the workshop at a workbench (with stools available between steps). If you prefer long sitting sessions, plan for that reality and wear closed shoes.
In This Review
- Why This Rhodes Workshop Is Worth Your Time
- Rhodes Stained Glass in a Real Studio Setting
- Price and Value: What You’re Paying For
- The Start: Meeting at Ir. Politechniou 9
- Tools First: Getting Comfortable Before You Cut
- Picking a Pattern and Selecting Your Glass Opals
- Opal Cutting: The Step That Makes Your Design Real
- Grinding and Smoothing: Where the Piece Starts to Look Professional
- Copper Tape and Soldering: The Tiffany-Style Finish
- What You’ll Take Home (And Why It Feels Like a Real Souvenir)
- Who This Workshop Suits Best (And Who Should Skip It)
- Logistics That Matter: Transport, Tickets, and Dress
- Should You Book This Stained Glass Workshop?
- FAQ
- Where is the workshop located?
- What time does the workshop start?
- How long does the workshop last?
- How many people are in a class?
- Is food and drink included?
- Do I get to choose the design and glass colors?
- Will I take home what I make?
- What should I wear?
- Is private transportation included?
- Can I cancel for a full refund?
Why This Rhodes Workshop Is Worth Your Time
Small group, personal guidance: classes cap at 2 people for hands-on coaching.
Tiffany method fundamentals: you’ll learn the basics behind copper-taping and soldering.
A clear step-by-step timeline: you’ll move through tools, cutting, opal choice, grinding, and assembly in order.
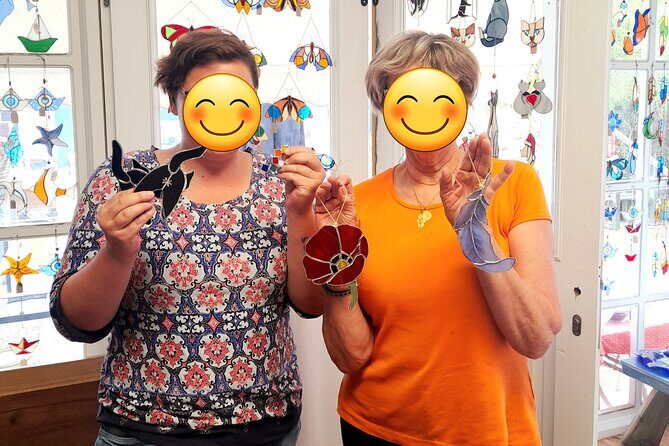
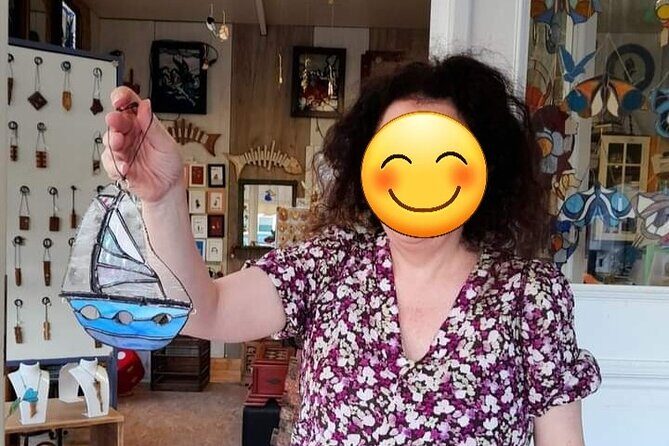
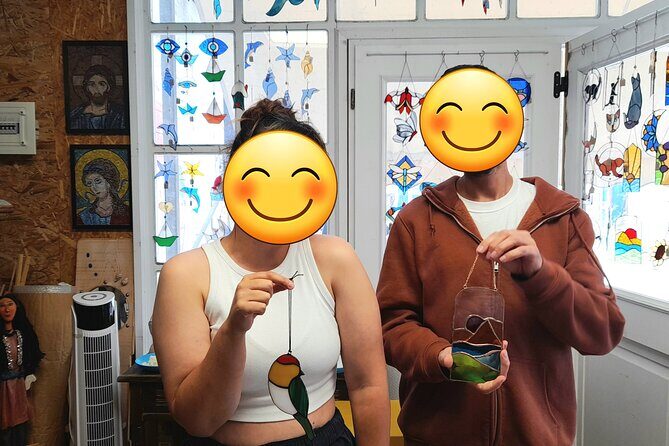
You take home what you make: each student’s design is unique.
Refreshments included: coffee, juices, tea, and snacks come throughout the course.
Practice-friendly pace: there’s no time pressure feeling; you get to learn the process properly.
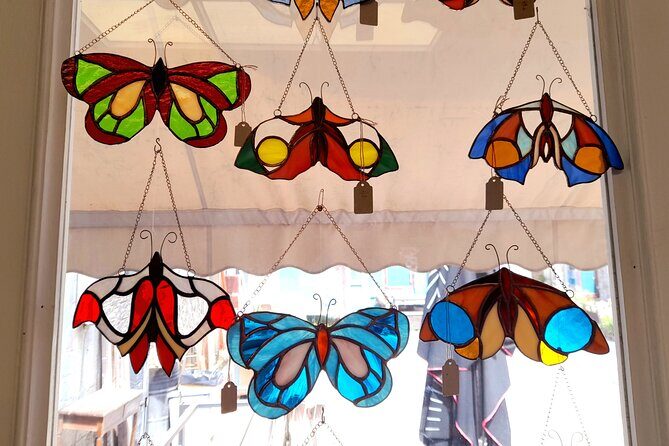
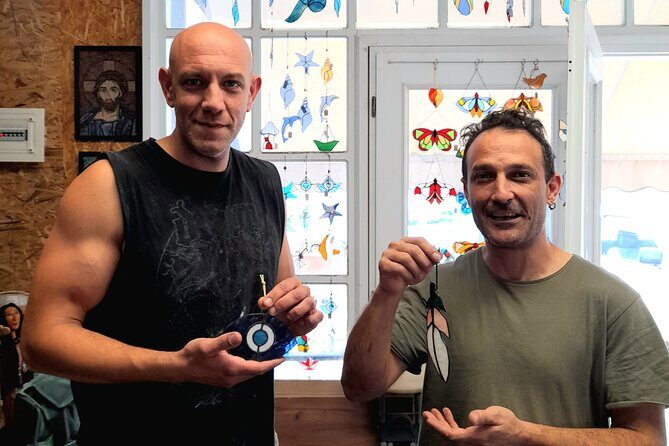
Rhodes Stained Glass in a Real Studio Setting
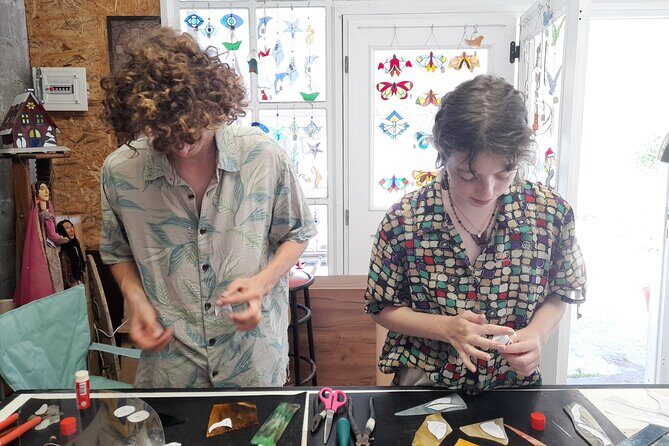
This workshop takes place in a studio in Rhodes where you’ll work at a bench using a colorful selection of glass. It’s not a showroom experience where you pick from a finished example and leave. Instead, you’re making something from scratch, using the same core steps that stained glass makers use—just taught at a beginner-friendly pace.
The workshop is designed to be relaxed and encouraging, with enough time to work at your own speed. That matters because stained glass is equal parts patience and technique. If you take your time learning the motions now, your final piece looks more intentional later.
And there’s a nice detail that makes the class feel approachable: you’ll start by getting comfortable with the tools before you jump into the more delicate cuts. That reduces the common beginner panic of, What if I mess this up? You’ll be guided through what each tool does and how to use it properly.
Finally, this is described as one of the only stained glass options in Rhodes that offers this specific kind of workshop experience. If you’re the sort of traveler who likes doing one memorable craft (not just taking photos), this is a good fit.
A few more Rhodes tours and experiences worth a look


Price and Value: What You’re Paying For
The price is $136.49 per person for a session of about 4 hours 45 minutes (the steps are broken into timed stages). That might sound like a lot for a single day, but the value is in what you actually get: personal instruction in a small class and a take-home stained glass piece.
What supports the price:
- 2-person classes mean more coaching time and less waiting.
- Included refreshments (coffee, juices, tea, and snacks) reduce extra costs during the activity.
- Materials and process are part of the class—especially the parts that take time: cutting, grinding, copper taping, and soldering.
What helps you decide: a stained glass suncatcher is a souvenir you can keep. It’s not just a photo memory. If you’ve ever tried a craft on a vacation and felt like it was too rushed to feel satisfying, this format is built to avoid that.
Also, it’s typically booked about 26 days in advance on average. That’s a hint that the schedule can fill up during busy stretches, so if you want a specific day, don’t wait until the last minute.
The Start: Meeting at Ir. Politechniou 9
You start at 10:00am at Ir. Politechniou 9, Rodos 851 00, Greece. The activity ends back at the meeting point, so you’re not dealing with a complicated drop-off plan afterward.
It’s also noted as being near public transportation, which is helpful if you’re not taking a private car around Rhodes. If you’re planning your day, build in a bit of buffer time for the walk or short transit hop to the studio, especially since you’ll be in closed shoes and in workshop mode.
This is also set up as a private tour/activity for your group. That means the experience is only for your party, not mixed with random unrelated participants from other languages and time slots.
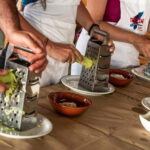
Tools First: Getting Comfortable Before You Cut
The workshop begins with familiarisation of tools (about 10 minutes). This is where you learn how the tools work and how to handle them correctly. It’s a small step time-wise, but it’s a big one for the rest of the class.
Here’s why I think this matters for beginners: stained glass cutting depends on technique. If you start cutting without understanding the tool and the basic angle feel, you end up fighting the process. Starting with tool basics helps you make cleaner cuts and stay calmer.
You’ll then move into cutting glass practice with clear glass (about 30 minutes). This practice step includes learning different angles and styles of cutting. It’s also the stage where you can build confidence before you switch to the more design-driven pieces.
A detail I really like from the experience is that there’s practice built in. One couple noted that they could practice on glass offcuts, and that’s exactly what you want at this stage—room to learn without it feeling like you’re risking the main design.
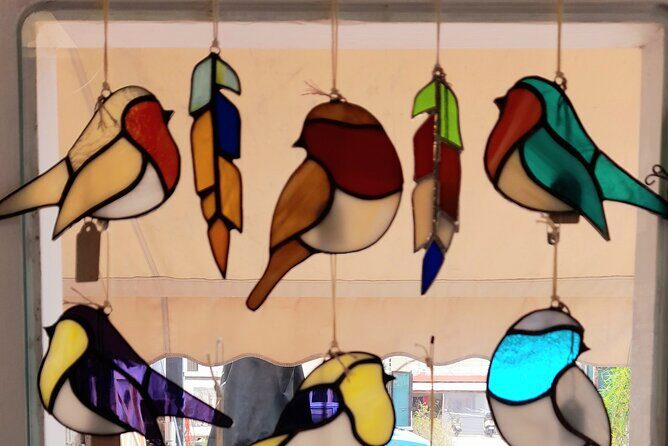
Picking a Pattern and Selecting Your Glass Opals
Next comes pattern selection (about 25 minutes). There are variety of patterns, aimed at beginners as well as more advanced options, and you can choose designs that include up to 10 pieces. If you want a satisfying result without turning the project into a full obsession, a smaller pattern is a smart choice.
Then you’ll get glass selection time (about 25 minutes). This is where you choose from colored opals. This is also where the workshop shifts from technical to personal. Your color choices are what determine the look of the piece once everything is cut and assembled.
Practical tip: spend a moment imagining the final effect when sunlight hits the colors. Opals tend to glow differently than clear glass, so think about contrast—do you want soft blending, or do you want stronger color blocks?
At this point you’ve got a plan: pattern pieces mapped to where each opal cut will go. That clarity helps the rest of the workshop flow smoothly.


Opal Cutting: The Step That Makes Your Design Real
The heart of the work comes in opal cutting (about 60 minutes). This is not just cutting random shapes. Each design piece must be cut in the opal you’ve chosen, which means your pattern and your color decisions link directly to the final look.
You’ll work through each piece at the bench while you learn how the cut should feel and what “good” looks like. The class format—relaxed, encouraging, and taught step-by-step—makes this stage manageable even if it’s your first time with stained glass tools.
If you’re worried about accuracy, focus less on perfection and more on consistency. Cleaner technique usually comes from the body learning the motion. That’s why practice in the earlier cutting step matters so much.
Grinding and Smoothing: Where the Piece Starts to Look Professional

After cutting, you’ll move to grinding cut glass edges (about 60 minutes). This is the moment when you correct and smooth the sides of the pieces you cut.
This step is key for two reasons:
1) It helps pieces fit properly when you apply copper tape.
2) It prevents rough edges that make handling the piece unpleasant.
It’s also a nice stage psychologically. Cutting can feel tricky; grinding can feel more like shaping. You get visible progress as the edges become smooth and workable.
If you want a tip that pays off fast: take your time here. A few extra minutes smoothing now often saves you stress later when you’re taping and assembling.
Copper Tape and Soldering: The Tiffany-Style Finish
Next, you’ll put copper tape on each glass piece (about 40 minutes). Copper tape is what creates the frame for soldering and gives stained glass that classic look. When done well, it holds the structure together while also making the colors pop.
Then you’ll join everything by soldering (about 35 minutes). This is the final build stage where your separate pieces become a single design.
From a value point of view, this is where the workshop earns its keep. Many arts-and-crafts classes stop at coloring or assembling pre-cut bits. Here, you’re learning the core joining steps that make stained glass durable and visually cohesive.
One more practical consideration: soldering and tool work are done while you’re working at the bench. The workshop notes that you usually stand during creating, with stools to sit on in-between. Wear clothes you don’t mind getting a little workshop dust on and keep shoes closed and sturdy.
What You’ll Take Home (And Why It Feels Like a Real Souvenir)
The workshop is set up so each student takes home something unique created that day. With the 2-person class limit, that uniqueness isn’t just marketing. You’re actively working your chosen pattern and your chosen opals through every stage.
The emotional payoff here is real. You’re making the piece yourself, watching it transform from glass fragments into a finished design. Then you can display it at home, where it becomes a daily reminder of Rhodes—sunlight included.
And since you’re learning hands-on skills (not just doing one step), the experience sticks. Even if you never make another piece after, you’ll understand the basics enough to appreciate stained glass craftsmanship more when you see it in churches and old buildings.
Who This Workshop Suits Best (And Who Should Skip It)
This is a strong match for:
- Couples or friends who want a shared activity with a tangible result
- Travelers who like hands-on learning, not just sightseeing
- People who want small-group attention and a calm, encouraging pace
- Beginners who want step-by-step instruction in tools, cutting, grinding, taping, and soldering
It’s less ideal if:
- You don’t like standing for long periods (you’ll mostly be standing at the workbench)
- You have mobility limits that make bench work difficult
- You are pregnant or breastfeeding, since the workshop notes it is not suitable
If you’re unsure, your best move is to be honest with yourself about stamina and comfort. The activity is structured, but it’s still workshop work.
Logistics That Matter: Transport, Tickets, and Dress
A few practical notes that help you show up ready:
- Start time is 10:00am, and it runs about 4h45.
- You’ll meet at Ir. Politechniou 9 and return there at the end.
- It’s near public transportation, and private transportation is not included.
- You’ll receive confirmation at booking.
- You’ll use a mobile ticket.
Dress for making. Wear sensible clothing and closed shoes. You’ll be at a workbench, using tools, cutting and grinding glass, and handling materials that are messy in a normal craft way.
Should You Book This Stained Glass Workshop?
If you want a vacation souvenir that’s personal and actually made by your hands, I’d book it. The biggest reasons are the small class size (max 2) and the structured skill progression—from tools and cutting to grinding, copper tape, and soldering. That combination makes the workshop feel both approachable and satisfying.
I’d especially recommend it if you like creative activities that don’t rush. The workshop is built to let you work at your own pace, and that matters when you’re learning something precise.
Skip it only if standing for most of the session would be uncomfortable, or if the pregnancy/breastfeeding note applies to you. Otherwise, this is one of those Rhodes activities that turns a day into a keepsake.
FAQ
Where is the workshop located?
It starts at Ir. Politechniou 9, Rodos 851 00, Greece, and it ends back at the meeting point.
What time does the workshop start?
The start time is 10:00am.
How long does the workshop last?
It lasts about 4 hours 45 minutes.
How many people are in a class?
There is a limit of 2 people per class, which supports individual tuition.
Is food and drink included?
Yes. Coffee, juices, tea, and snacks are offered throughout the course.
Do I get to choose the design and glass colors?
Yes. You’ll choose a pattern and then select colored opals from the available glass selection.
Will I take home what I make?
Yes. Each student takes home something unique that they created during the workshop.
What should I wear?
Wear sensible clothing and closed shoes. You’ll usually be standing at a workbench, with stools available in between.
Is private transportation included?
No. Private transportation is not included, but the workshop is near public transportation.
Can I cancel for a full refund?
Yes, you can cancel up to 24 hours in advance for a full refund. If you cancel less than 24 hours before the start time, the amount paid will not be refunded.